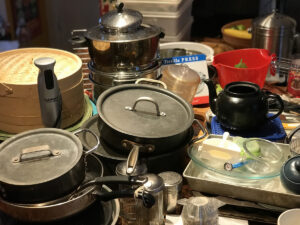
If decluttering queen Marie Kondo has three donabe (traditional Japanese clay cooking pots) in her kitchen, why are my five, identical 8-inch pie dishes considered hoarding? I typically keep only two stacked in my bakeware cupboard, but they’d both gone missing leading up to Thanksgiving when I needed to simultaneously produce chocolate, apple and pumpkin pies. So I hit Goodwill to take advantage of my KonMari-crazed neighbors holding on only to those material things that bring them joy.
I’ve thumbed through Kondo’s mega best-seller “The Life-Changing Magic of Tidying Up.” And I’ve watched a couple of episodes of her Netflix series in which she helps hoarders of greater degree than I sort through their possessions, organize the ones they love and re-home everything else. As I understand the process, most of the things you find in the kitchen don’t fall within her primary declutter-able categories which are clothes, books and paper. Kitchen items are classified as “komono,” or miscellaneous, and her advice on whether they should stay, or they should go, is not quite as detailed. She still believes all kitchen things should bring you joy, but she does leave room for a thing’s utility to be the source of that joy.
I Marie Kondoed my kitchen last week with an eye toward assessing every kitchen item’s worth for delight and usefulness in equal measure.
The process enabled me to finally let go of a beautiful (and likely expensive) bubble whisk I’d been given but whose handle was too heavy to stay hands-free in a bowl without flipping out upside down and spraying batter all over the ceiling. Not joyful. Not useful.

I found both pie dishes I’d misplaced early last fall and the three I picked up at Goodwill as Thanksgiving replacements. I get no aesthetic pleasure from a flat-edged Pyrex dish, but beyond pies, they also cradle thawing fish fillets effectively and are perfect for meal-train quiche transport. So utility trumps joy on this score. That said, Marie convinced me to return three in the stack to Goodwill.
She gave me the strength to say goodbye to duplicate pots and pans we received at our wedding that have since lived with us in four states. They came in handy occasionally when go-to pans were dirty or dinner guest lists were long, but not often enough to merit shelf space in my Kondo-ized kitchen. I hope the new Mainers residing at Hope House in Portland will find them as comforting as I did when entertaining new friends in new surroundings.
My daughter claimed a stack of well-used tea towels we’d picked up on our travels around Europe as souvenirs to make a memory quilt. And I plan to drop off stacks of cloth placemats that matched my dining room decor back in my first house in Pennsylvania in the textiles repurposing bin at H&M in Boston the next time she drags me there to shop.
There were many foodie gadgets I acquired that I thought would bring me joy and didn’t. The stick blender just can’t hold a candle to my Blendtec beast. I didn’t have a pot big enough to steam anything in the huge bamboo steamer I bought. The tortilla press has not been used since I discovered Tortilleria Pachanga’s products. And the set of Swedish Sandbakkelse (sand tarts) molds that came in a box from my husband’s grandmother had never been used. But within 30 minutes of posting photos of these things on Facebook, they were spoken for by friends willing to give joy a chance.
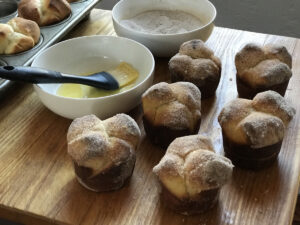
I was stumped, though, when it came to my brioche pans: one big one and 18 small ones. Brioche mastery is a personal goal I’ve not yet made much progress on. But these shiny tins came all the way from France. Torn, I split the difference. I kept the big one and followed pastry guru Joanne Chang’s advice and pressed into service the one cupcake tin Kondo let me keep to make individual brioche.
While she’s made it more joyful, Kondo’s basic premise toward kitchen decluttering is a long-standing sustainable one: reduce, reuse, recycle.

SUGAR AND SPICE BRIOCHE BUNS
This recipe is adapted from Joanne Chang’s “Flour: A Baker’s Collection of Spectacular Recipes.” The recipe makes a large batch so that your KitchenAid dough hook has enough mass to knead properly. The dough freezes well, though, so don’t hesitate to put half in the freezer if you don’t want 20 of these beauties calling your name at once.
Makes 10-20 buns
FOR THE DOUGH:
2 1/4 cups (315 grams) all-purpose flour
2 1/4 cups (340 grams) bread flour
3 1/4 teaspoons active dry yeast
1/2 cup plus 1 tablespoon (82 grams) sugar
1 tablespoon salt
1/2 cup cold water
5 large eggs
1 cup plus 6 tablespoons (2 3/4 sticks/310 grams) unsalted butter, at room temperature, cut into about 12 pieces.
FOR THE TOPPING:
1/2 cup (100 grams) sugar
1/2 teaspoon ground cinnamon
1/4 teaspoon ground ginger
1/4 teaspoon ground nutmeg
Pinch ground cloves
Pinch salt
1/4 cup (56 grams) unsalted butter, melted

Using a stand mixer fitted with the dough hook, combine flours, yeast, sugar, salt, cold water and eggs. Beat on low speed until all the ingredients are combined, about 4 minutes. Once the dough has come together, beat on low speed for another 4 minutes. Add the butter, one piece at a time, mixing after each addition until it disappears into the dough. It is important for all the butter to be thoroughly mixed into the dough. If necessary, stop the mixer occasionally and break up the dough with your hands to help mix in the butter. Once the butter is completely incorporated, turn up the speed to medium and beat until the dough becomes sticky, soft and somewhat shiny, about 15 minutes.
Put the dough in a large bowl and cover it tightly, pressing the wrap directly onto the surface of the dough. Let the dough proof in the refrigerator for 6-24 hours. Divide the dough in half. Use half for this recipe and reserve the other half for another use. At this point you can freeze the dough in an airtight container for up to one week.
To make the topping, place all ingredients, except for the melted butter, in a bowl and mix together with a spoon. Set aside.
To form the buns, line 10 cups of a 12-cup muffin tin with paper liners or generously butter and flour them.
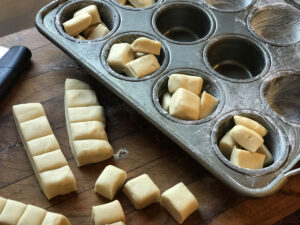
On a floured work surface, press dough into a 10- by 5-inch rectangle. Using a bench scraper or knife, cut dough into 50 1-inch pieces. Place five squares in each prepared muffin cup.
Cover loosely and place in a warm spot for about 1 1/2 hours, until the dough has risen and feels puffy and soft.

Heat oven to 350 degrees and place rack in center of oven. Bake brioche buns for 25 to 35 minutes, until golden brown. Let buns cool for 5 to 10 minutes on a wire rack until cool enough to handle. Brush tops of buns with the melted butter. Roll the buns in the sugar mixture to coat evenly. Buns are best served within four hours of baking. They can be stored in an airtight container for up to one day, then rewarmed in a 300-degree oven for five minutes.
Christine Burns Rudalevige is a food writer, recipe developer and tester and cooking teacher in Brunswick, and the author of “Green Plate Special,” a cookbook from Islandport based on these columns. She can be contacted at:
cburns1227@gmail.com
Comments are no longer available on this story